
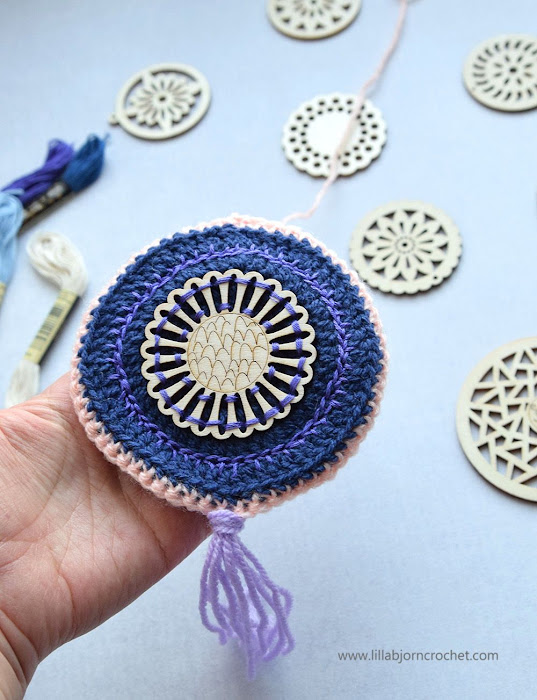
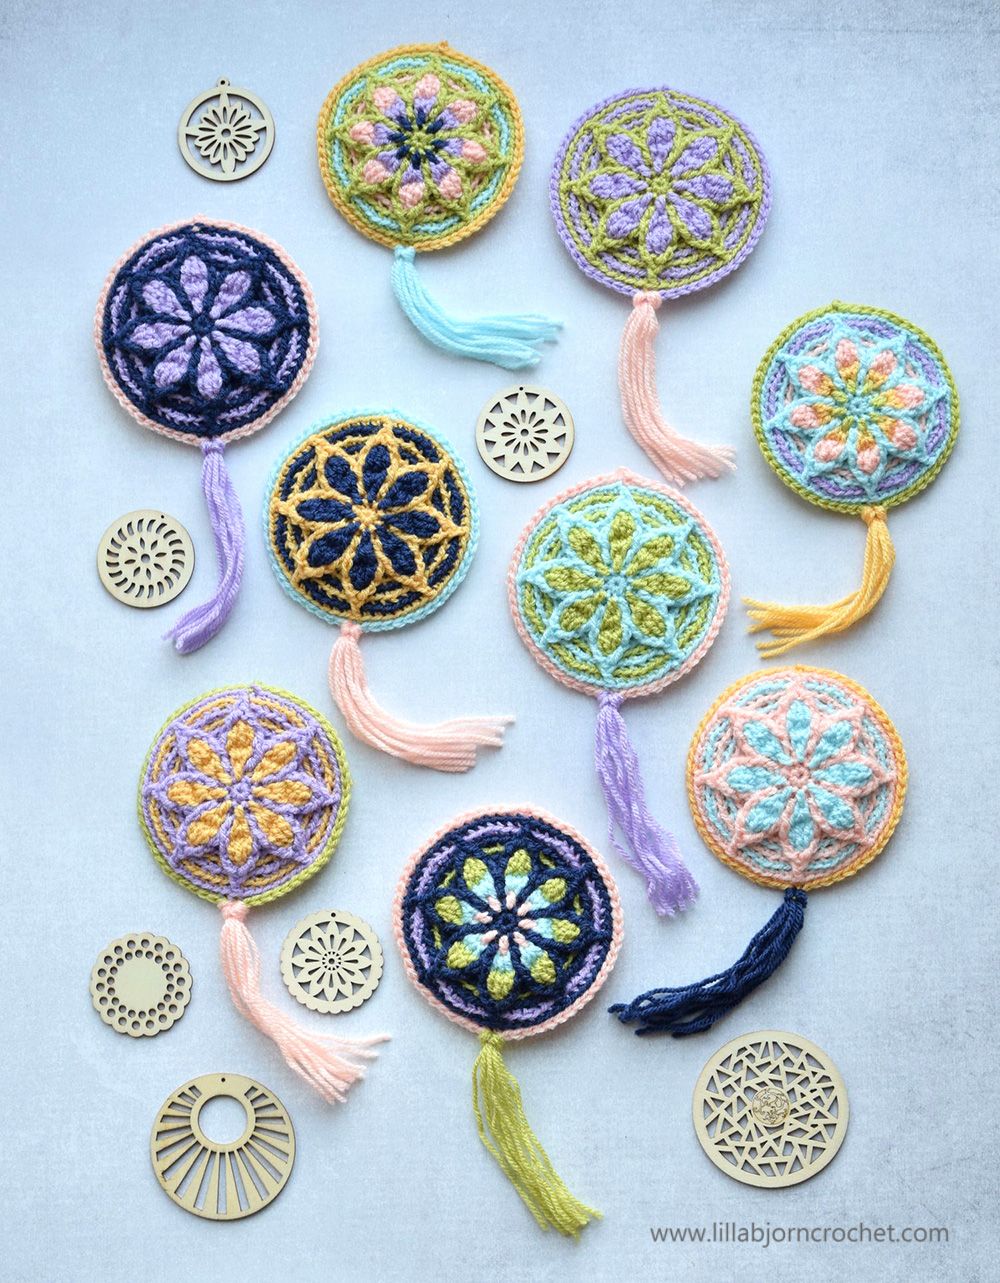
Hello and welcome to the very last bit of Rozeta CAL. I hope you had a very good rest during holidays with lots of time to finish your Rozeta. Most likely you have yarn in some colors left. And you were probably guessing why there was wooden ornament and embroidery thread included into the Rozeta kits. So today I will answer your questions! We will be using leftovers and wooden ornament to create a small hanging decoration a micro Rozeta, as I called this pattern.
Micro Rozeta pattern uses same stitches as you practiced a lot during the CAL. The textured flower is made in overlay crochet technique. The pattern is not tricky, and I hope that with the help of progress pictures below you will have no difficulties to finish it.
Hanging ornament consists of two parts. The top is decorated with flower, and the bottom is plain. I added very simple embroidery onto the bottom. You received plenty of embroidery thread in your kits, and you can go a bit wild and creative with embroidery. And hopefully Rozeta leftovers will be enough to finish several micro hangings.
The pattern below uses US crochet terms. And you can also download pdf files in English (both US and UK) and Dutch. The pdfs contain only written instructions, and progress pictures are available for viewing on my blog. Please, note that there is no video available for this pattern.
Hope youll enjoy the pattern! And I cant wait to see your pictures.
3mm crochet hook for Our Tribe yarn*,
3.5mm crochet hook for Colour Crafter yarn*
Wooden ornament, yarn needle, embroidery thread
Approx. 9cm/3.5 across with Our Tribe*
FPtr front post treble crochet
FPtr3tog front post treble crochet 3 together
rep(s) repeat(s)
RS right side
sc single crochet
st(s) stitch(es)
WS wrong side

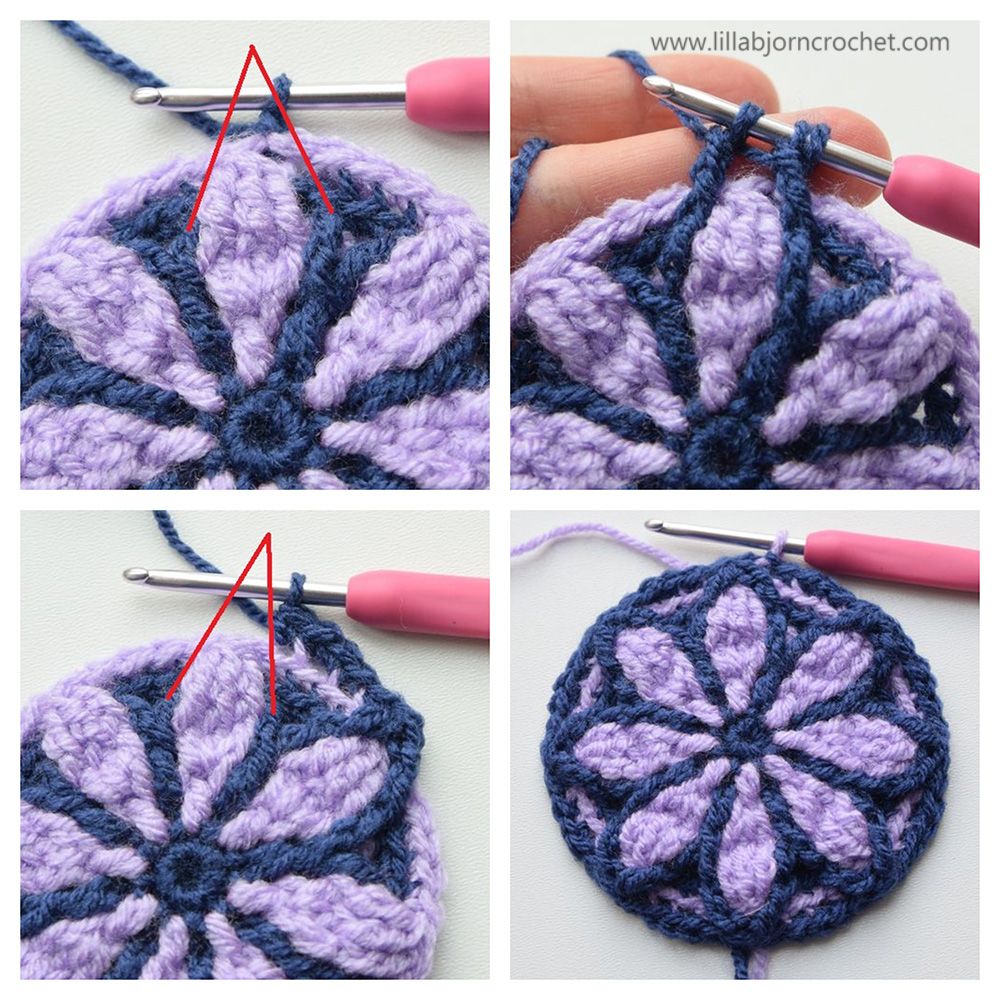
Every round of the top flower is made with just one color. The yarns are not cut after every round but are carried up to next rounds on the wrong side. The colors are changed in the joining slip stitch (unless otherwise stated in the pattern).
The color key for Yarn A and B is just for the needs of this pattern and doesnt correspond with the key for the Rozeta CAL blanket. Please, use the colors according to your taste, and use more than two colors per ornament, if you like.
All sc stitches are made into back loops (BL). Front loops (FL) stay unworked and overlay stitches from next rounds are anchored to them by inserting the hook from the bottom to top (see pics in the pattern). Stitches of the previous round are skipped (or not skipped) behind overlay long stitches as stated in the pattern. Please, be careful with skipping stitches.

********************************************************************
Copyright. An original LillaBjrnCrochet Design (Tatsiana Kupryianchyk). Copyright 2014-2020. All rights reserved. This pattern is for personal use only. It cannot be sold, redistributed or edited in any way. Translations and video tutorials are not allowed. You can sell your finished products, but you cannot use my pictures to promote them. Please, always note me as a designer of this pattern. Thank you!
TOP MANDALA with FLOWER
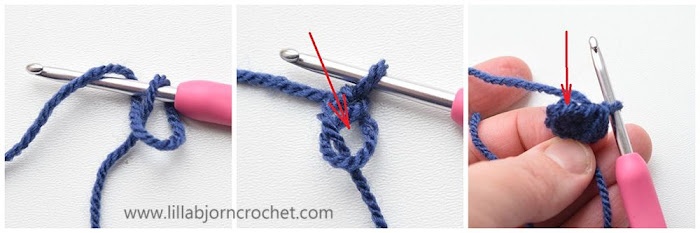
Round 1. With Yarn A. Make magic ring, ch1 (doesnt count as a st here and throughout), 8sc into magic ring, join with ss in first sc 8 sts
Round 2. On this and all next rounds all sc are made in BL.
Continue with Yarn A. Ch1, 2sc in same st as join, 2sc in each st around, join with ss in first sc (change to Yarn B) 16 sts

Round 3. All eight FL on Round 1 will be occupied with one dc.
With B. Ch1, 1sc in same st as join, *1dc (FL) in a st of Round 1 directly below, skip no sts behind dc, 2sc; rep from * 6 more times, 1dc (as prev), skip no sts, 1sc, join with ss in first sc (change back to Yarn A) 24 sts
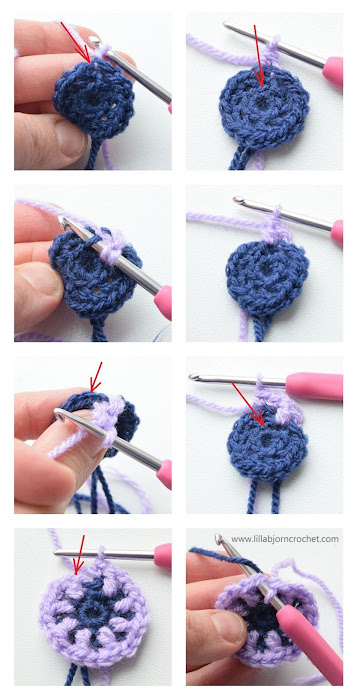
Round 4. First sc is made in same st as join.
With A. Ch1, *3sc, 1dc (FL) in a st of Round 2 visible between two dc below, skip no sts; rep from * 7 more times, join with ss in first sc (change to B) 32 sts

Round 5. First skipped st will be same st as join.
With B. Ch1, *1FPtr around dc of same color below, 2dc into the hole at the bottom of FPtr just made, skip 3 sts, 1sc in next dc of prev round; rep from * 7 more times, join with ss in first FPtr, ss in next dc (change to A) 32 sts
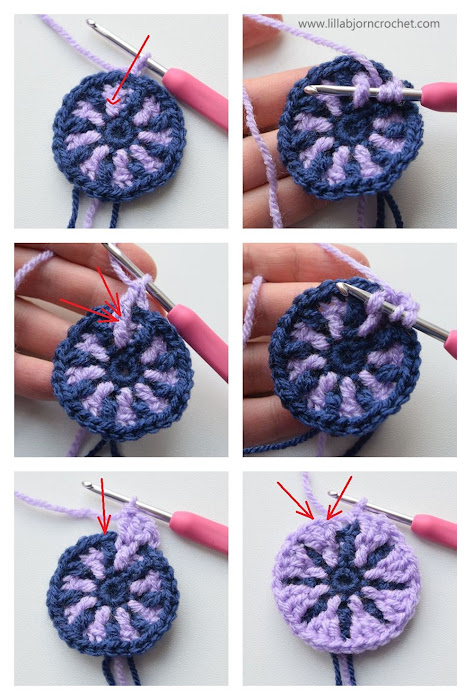
Round 6. First sc is made in same st as last ss.
With A. Ch1, *1sc, 1FPtr around next dc of same color below, skip 1 st, 2sc in next st, 1FPtr around same dc below, skip 1 st; rep from * 7 more times, join with ss in first sc (change to B) 40 sts

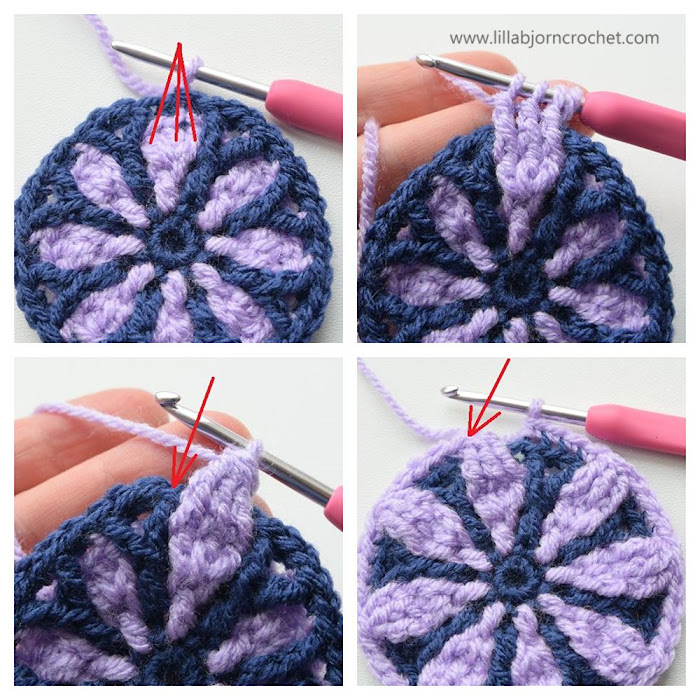
Round 7. First skipped st is same st as join.
With B. Ch1, *1FPtr3tog over FPtr and 2 dc of same color below, skip 1 st, 4sc making first sc in next FPtr; rep from * 7 more times, join with ss in first FPtr3tog (change to A) 40 sts
Round 8. First skipped st is same as join.
With A. Ch1, *1FPtr2tog around two FPtr of same color below lying to the right and to the left of FPtr3tog below, skip 1 st, 2sc, 2sc in next st, 1sc; rep from * 7 more times, join with ss in first FPtr2tog (change to B) 48 sts

Round 9. First sc is made in same st as join.
With B. Ch1, *2sc, 2sc in next st, 3sc; rep from * 7 more times, join with ss in first sc (change to A) 56 sts

Round 10.First skipped st is same as join.
With A. Ch1, *1FPdc around FPtr2tog of same color below, skip 1 st, 7sc, 1FPdc (as prev), skip no sts, 6sc; rep from * 3 more times, join with ss in first FPtr (change to B or any other color, cut A) 60 sts

BOTTOM
Round 1. With Yarn A. Make magic ring, ch2 (doesnt count as a st here and throughout), 12dc into ring, join with ss in first dc 12 sts
Round 2. Ch2, 2dc in same st as join, 2dc in each st around, join with ss in first dc 24 sts
Round 3. Ch2, 1dc in same st as join, 2dc in next st, *1dc, 2dc in next st; rep from * 10 more times, join with ss in first dc 36 sts
Round 4. Ch2, 1dc in same st as join, 1dc, 2dc in next st, *2dc, 2dc in next st; rep from * 10 more times, join with ss in first dc 48 sts
Round 5. Ch2, 1dc in same st as join, 2dc, 2dc in next st, *3dc, 2dc in next st; rep from * 10 more times, join with ss in first dc 60 sts
If after this round bottom is the same size as top with flower, please, fasten off. If bottom is smaller (or doesnt fit wooden ornament in size), please, make one more round with sc (insert the hook through both loops), and then fasten off.
Finishing
Sew wooden ornament onto the bottom part using yarn needle and embroidery thread. (Optional) Make embroidery as shown in the pictures.

Then place top and bottom parts together with WS facing each other and crochet them together with sc through BL of the last round. If you want to stuff ornament, please do it before two parts are completely joined. Join the round with ss into first sc, fasten off and hide the tail inside ornament. (Optional) Make a tassel.

Congratulations!! Your Micro Rozeta hanging ornament is now finished.
Subscribe to a newsletternot to miss a single post. You can also follow me onFacebook,PinterestandInstagram.

Hanging ornament consists of two parts. The top is decorated with flower, and the bottom is plain. I added very simple embroidery onto the bottom. You received plenty of embroidery thread in your kits, and you can go a bit wild and creative with embroidery. And hopefully Rozeta leftovers will be enough to finish several micro hangings.
The pattern below uses US crochet terms. And you can also download pdf files in English (both US and UK) and Dutch. The pdfs contain only written instructions, and progress pictures are available for viewing on my blog. Please, note that there is no video available for this pattern.
Hope youll enjoy the pattern! And I cant wait to see your pictures.
*****************************************************
Micro Rozeta hanging decoration - FREE crochet pattern
PDFs
Materials
Yarn in two or more colors (leftovers from Rozeta CAL)3mm crochet hook for Our Tribe yarn*,
3.5mm crochet hook for Colour Crafter yarn*
Wooden ornament, yarn needle, embroidery thread
Gauge/Tension
The gauge is not important for this patternMeasurements
Approx. 10cm/4 across with Colour Crafter*Approx. 9cm/3.5 across with Our Tribe*
Abbreviations (US terms)
dc double crochetFPtr front post treble crochet
FPtr3tog front post treble crochet 3 together
rep(s) repeat(s)
RS right side
sc single crochet
st(s) stitch(es)
WS wrong side
Repeat Formats
*.; rep from * once more/twice more/3 more times Work the instructions after * and then repeat that section a further number of times as stated. The same applies to any number of asterisks: **.; rep from ** etc
Pattern Notes
Micro Rozeta hanging ornament consists of two parts: top with textured overlay flower, and plain bottom. Wooden ornament is stitched onto the bottom part, a little embroidery is optionally added onto the bottom part, then both parts are crocheted together (and stuffed if desired).Every round of the top flower is made with just one color. The yarns are not cut after every round but are carried up to next rounds on the wrong side. The colors are changed in the joining slip stitch (unless otherwise stated in the pattern).
The color key for Yarn A and B is just for the needs of this pattern and doesnt correspond with the key for the Rozeta CAL blanket. Please, use the colors according to your taste, and use more than two colors per ornament, if you like.
All sc stitches are made into back loops (BL). Front loops (FL) stay unworked and overlay stitches from next rounds are anchored to them by inserting the hook from the bottom to top (see pics in the pattern). Stitches of the previous round are skipped (or not skipped) behind overlay long stitches as stated in the pattern. Please, be careful with skipping stitches.

********************************************************************
INSTRUCTIONS
Copyright. An original LillaBjrnCrochet Design (Tatsiana Kupryianchyk). Copyright 2014-2020. All rights reserved. This pattern is for personal use only. It cannot be sold, redistributed or edited in any way. Translations and video tutorials are not allowed. You can sell your finished products, but you cannot use my pictures to promote them. Please, always note me as a designer of this pattern. Thank you!
TOP MANDALA with FLOWER
Round 1. With Yarn A. Make magic ring, ch1 (doesnt count as a st here and throughout), 8sc into magic ring, join with ss in first sc 8 sts

Round 2. On this and all next rounds all sc are made in BL.
Continue with Yarn A. Ch1, 2sc in same st as join, 2sc in each st around, join with ss in first sc (change to Yarn B) 16 sts

Round 3. All eight FL on Round 1 will be occupied with one dc.
With B. Ch1, 1sc in same st as join, *1dc (FL) in a st of Round 1 directly below, skip no sts behind dc, 2sc; rep from * 6 more times, 1dc (as prev), skip no sts, 1sc, join with ss in first sc (change back to Yarn A) 24 sts

Round 4. First sc is made in same st as join.
With A. Ch1, *3sc, 1dc (FL) in a st of Round 2 visible between two dc below, skip no sts; rep from * 7 more times, join with ss in first sc (change to B) 32 sts

Round 5. First skipped st will be same st as join.
With B. Ch1, *1FPtr around dc of same color below, 2dc into the hole at the bottom of FPtr just made, skip 3 sts, 1sc in next dc of prev round; rep from * 7 more times, join with ss in first FPtr, ss in next dc (change to A) 32 sts

Round 6. First sc is made in same st as last ss.
With A. Ch1, *1sc, 1FPtr around next dc of same color below, skip 1 st, 2sc in next st, 1FPtr around same dc below, skip 1 st; rep from * 7 more times, join with ss in first sc (change to B) 40 sts

Round 7. First skipped st is same st as join.
With B. Ch1, *1FPtr3tog over FPtr and 2 dc of same color below, skip 1 st, 4sc making first sc in next FPtr; rep from * 7 more times, join with ss in first FPtr3tog (change to A) 40 sts

Round 8. First skipped st is same as join.
With A. Ch1, *1FPtr2tog around two FPtr of same color below lying to the right and to the left of FPtr3tog below, skip 1 st, 2sc, 2sc in next st, 1sc; rep from * 7 more times, join with ss in first FPtr2tog (change to B) 48 sts
Round 9. First sc is made in same st as join.
With B. Ch1, *2sc, 2sc in next st, 3sc; rep from * 7 more times, join with ss in first sc (change to A) 56 sts

Round 10.First skipped st is same as join.
With A. Ch1, *1FPdc around FPtr2tog of same color below, skip 1 st, 7sc, 1FPdc (as prev), skip no sts, 6sc; rep from * 3 more times, join with ss in first FPtr (change to B or any other color, cut A) 60 sts

BOTTOM
Round 1. With Yarn A. Make magic ring, ch2 (doesnt count as a st here and throughout), 12dc into ring, join with ss in first dc 12 sts
Round 2. Ch2, 2dc in same st as join, 2dc in each st around, join with ss in first dc 24 sts
Round 3. Ch2, 1dc in same st as join, 2dc in next st, *1dc, 2dc in next st; rep from * 10 more times, join with ss in first dc 36 sts
Round 4. Ch2, 1dc in same st as join, 1dc, 2dc in next st, *2dc, 2dc in next st; rep from * 10 more times, join with ss in first dc 48 sts
Round 5. Ch2, 1dc in same st as join, 2dc, 2dc in next st, *3dc, 2dc in next st; rep from * 10 more times, join with ss in first dc 60 sts
If after this round bottom is the same size as top with flower, please, fasten off. If bottom is smaller (or doesnt fit wooden ornament in size), please, make one more round with sc (insert the hook through both loops), and then fasten off.
Finishing
Sew wooden ornament onto the bottom part using yarn needle and embroidery thread. (Optional) Make embroidery as shown in the pictures.

Then place top and bottom parts together with WS facing each other and crochet them together with sc through BL of the last round. If you want to stuff ornament, please do it before two parts are completely joined. Join the round with ss into first sc, fasten off and hide the tail inside ornament. (Optional) Make a tassel.


Congratulations!! Your Micro Rozeta hanging ornament is now finished.
Subscribe to a newsletternot to miss a single post. You can also follow me onFacebook,PinterestandInstagram.